Implementing Garbage Classification and Video Object Classification Applications with AscendCL on Ascend AI
Nowadays, artificial intelligence is developing rapidly, and the pace at which AI empowers industrial development is accelerating, leading to a surge in "AI+" demands. However, significant challenges persist in the rapid deployment of AI applications: compatible hardware is required at the lower layer, and comprehensive technical support is needed at the upper layer; both are indispensable.
To address this, Ascend has launched a series of industry SDKs and reference designs. By consolidating and horizontally replicating development experience and industry knowledge from various segmented scenarios across diverse industries, these offerings significantly lower the barrier, simplify development, and improve efficiency. Xinmai Technology, an important APN partner and gold distributor of Ascend, possesses strong independent hardware design capabilities. The two parties work closely together to create a software-hardware integrated computing foundation that better meets industry needs, empowering industries for rapid and low-cost digital transformation.
This case study demonstrates how to quickly implement garbage classification and video object classification applications using AscendCL, helping developers reduce learning costs, simplify development processes, and shorten project cycles!
Case Overview
① Garbage Classification Application: Based on AscendCL, this application detects garbage categories in images and outputs images with the detected categories.
② Video Object Classification Application: Based on the GoogLeNet classification network, this application identifies and classifies objects in video frames and displays the classification results on a PC webpage.
Case Description
For the underlying principles and logic of this case, please refer to the Huawei Ascend AscendCL and case studies.
Prerequisites

Implementing Garbage Classification Application
1
Environment Setup
Notes:
➢ The following operations use installing the CANN package as a regular user HwHiAiUser as an example. It is recommended to operate as the root user. If you are the root user, please change all ${HOME} in the installation preparation to /usr/local.
➢ It is recommended to follow the paths in this document for operations. Installing in a custom path may lead to environment conflicts and other issues.
1. Configure the environment
# Execute the following command as the installation user in any directory to open the .bashrc file.
2. Install python-acllite
# Install some ffmpeg dependencies
2
Model Acquisition & Conversion
# Enter the case path; 'samples' is the case package downloaded in the previous step.
3
Test Data Acquisition
# Create and enter the data folder
4
Run the Case
Run Python code:
# 'data' here refers to the test data path
➢ If the run is successful and no errors occur, the following information will be displayed:
5
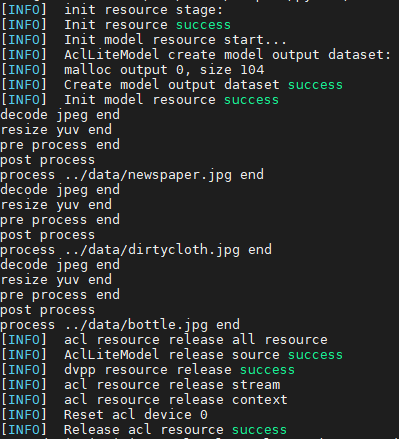
Case Demonstration
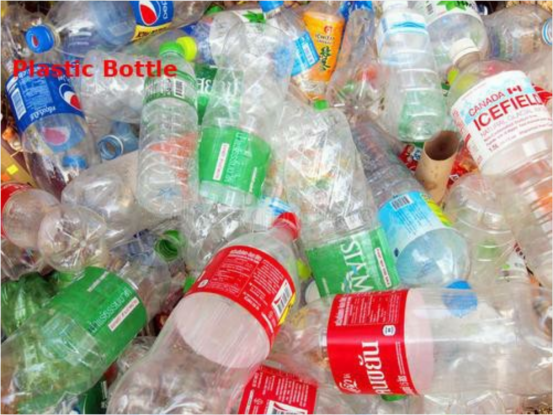
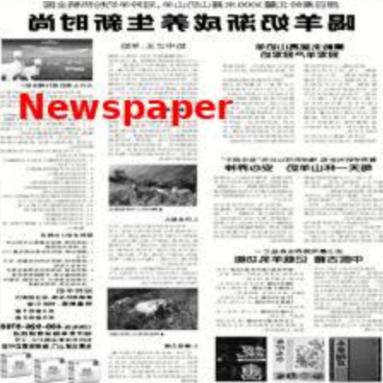
Images with detected categories will be generated in the 'out' folder under the case's root directory:

Implementing Video Object Classification Application
1
Environment Setup
Notes:
➢ The following operations use installing the CANN package as a regular user HwHiAiUser as an example. It is recommended to operate as the root user. If you are the root user, please change all ${HOME} in the installation preparation to /usr/local.
➢ It is recommended to follow the paths in this document for operations. Installing in a custom path may lead to environment conflicts and other issues.
1. Configure the environment
# Execute the following command as the installation user in any directory to open the .bashrc file.
2. Install OpenCV
# Execute the following command to install OpenCV (Note: Please ensure the installed version is 3.x)
3. Install Protobuf & PresentAgent
# Install Protobuf related dependencies
2
Model Conversion & Acquisition
Notes:
➢ This case uses a Caffe-based GoogLeNet model. The command to acquire the model has been provided. If developers need more model information, please refer to:
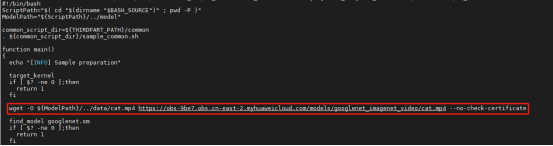
# Enter the case path; 'samples' is the case package downloaded in the previous step.
3
Compile and Run the Case
1. Execute the compilation script
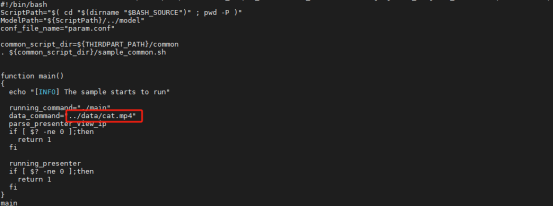
# Enter the script path
➢ After executing the compilation script, please select the arm/x86 format according to your actual situation. For operations on the device, please select: arm.

➢ The compilation script will automatically download the relevant video material: cat.mp4. If developers use other materials, they can delete this command in sample_build.sh.
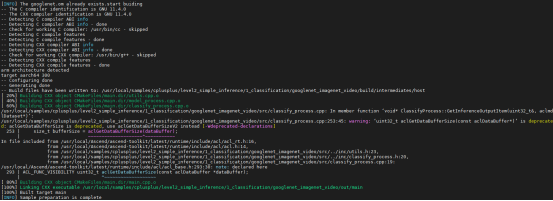
➢ After compilation is complete, relevant files will be generated and a "complete" message will be displayed.
2. Execute the script to run the case
# Grant script permissions
➢ After executing the run script, if this device has multiple IPs, please select and enter the IP that can connect to the external network, e.g., 10.1.30.111.

➢ After successful execution, "successfully" will be prompted, and a relevant web link will be provided.

➢ The run script defaults to reading the cat.mp4 material. If developers use other materials, they can change the material path in sample_run.sh.
4
Case Demonstration
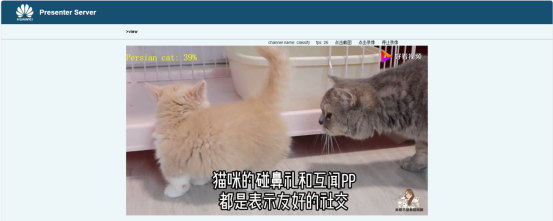
Open a browser and enter the provided web link and port number, e.g., 10.1.30.111:7007.
➢ After entering the interface shown below, wait for the status bar to turn green. You can click "Refresh" to update. When there is data, the Status of the corresponding Channel will turn green.
➢ After the status bar is normal, click the name under "View Name" on the right, e.g., classify.

➢ After entering the video object classification interface, the detected object category will be displayed in the upper left corner of the video, and the video frame rate will be displayed above the video. Developers can perform functions such as screenshots and video recording.
5
Related FAQ
- When installing Protobuf & PresentAgent, executing
${THIRDPART_PATH}/bin/protoc presenter_message.proto --cpp_out=./reports an error:protoc not such file or directory.
➢ This error may be due to a Protobuf installation issue:
# Go back to the Protobuf installation path: cd /usr/local/probuf
# Re-execute make install: make install
# Check if protoc exists under ${THIRDPART_PATH}/bin/
- An error occurred as shown in the figure below when executing the compilation script:

➢ This error may be due to an OpenCV version issue:
# Enter the error code