RK3399pro YOLOv5 AI Accelerated Inference Solution
0. Introduction:
This article introduces the deployment and inference of the YOLOv5s algorithm on the domestic Rockchip RK3399ProD. It describes the entire process, provides a brief introduction to using the RKNN Python API based on the RK3399Pro, and records some pitfalls encountered. This article is for discussion purposes only, and any misunderstandings or errors in the text are welcome for discussion.
1. Deployment Process
- On the server or PC, train the model. After training, convert the .pt file to ONNX format.
- On the PC, use rknn-toolkit 1.6.0 to convert the ONNX model to RKNN format.
- Perform model inference on the RK3399Pro. For the second step, model conversion, it can be done on an RK3399Pro with rknn-toolkit installed. Previously, when I didn't know better, I always converted on this development board. However, it is still recommended to convert on a PC running Ubuntu 18.04, as you can set a larger quantization batch size, which speeds up quantization.
- The development board used in this article is Xinmai Technology XM-3399-02.
2. Environment Setup
Environment issues can be quite tricky, as many people encounter various bugs here. The best approach is to directly pull the Docker image they provide on Ubuntu. Just pull it, and the environment will be pre-configured, then you can convert the model. For the development board, choose an official one. Official development board environments are the most user-friendly; the official RK3399Pro comes with the environment pre-installed, requiring minimal configuration and encountering fewer issues, making it excellent for algorithm verification.
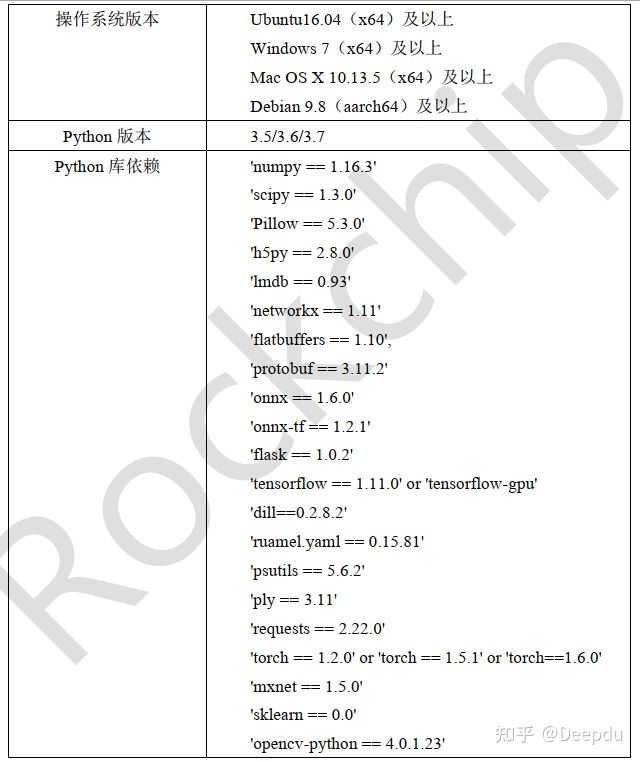
Next is the environment I configured on Ubuntu (using a somewhat clumsy method QAQ). This environment was installed according to the manual provided by RKNN. To install rknn-toolkit 1.6.0 or later, you need to install the dependency libraries beforehand, and the version requirements for these libraries are very strict; versions cannot differ at all, as detailed in the Rockchip_Quick_Start_RKNN_Toolkit_V1.6.1_CN.pdf file. On Ubuntu, I installed Python 3.6, and the rest of the environment was strictly configured according to the library dependencies below. After installing the dependencies, download the pre-compiled .whl file from Rockchip's official repository and simply pip install + xxx.whl in your environment.
Rockchip Official Git https://github.com/rockchip-linux/rknn-toolkit
3. Training YOLOv5s on the Server or PC
Project Address: https://github.com/littledeep/YOLOv5-RK3399Pro
There's not much to say about the training part. Clone the repository, modify the parameters according to your dataset, and then train. YOLOv5 training is quite user-friendly.
However, during YOLOv5 training, I chose to replace all SiLU layers with ReLU layers in the common file because it accelerates the converted RKNN model. This slightly reduces the overall mAP, and tests confirmed a decrease in overall mAP.

The Rockchip_Developer_Guide_RKNN_Toolkit_Custom_OP_V1.6.1_CN.pdf file provides a detailed explanation that using ReLU activation layers can fuse some layers, thereby optimizing performance.
4. Model Conversion ---> ONNX
According to the GitHub project, the .pt model trained with PyTorch needs to be converted to ONNX format first. You can convert it directly using the project's repository. Simply enter the following in the command line:
python3 models/export_op.py --rknn_mode
That's it.
5. Model Conversion ---> RKNN
Copy the converted xxxx.onnx model to the convert folder. The convert folder should contain the conversion script, the dataset.txt quantization file, and quantization images. It is recommended to use 200 quantization images and set the batch size as large as possible. In the command line, enter:
python rknn_convert.py
rknn_convert.py file code
import yamlfrom rknn.api import RKNNimport cv2 _model_load_dict = { 'caffe': 'load_caffe', 'tensorflow': 'load_tensorflow', 'tflite': 'load_tflite', 'onnx': 'load_onnx', 'darknet': 'load_darknet', 'pytorch': 'load_pytorch', 'mxnet': 'load_mxnet', 'rknn': 'load_rknn', } yaml_file = './config.yaml' def main(): with open(yaml_file, 'r') as F: config = yaml.load(F) # print('config is:') # print(config) model_type = config['running']['model_type'] print('model_type is {}'.format(model_type))#检查模型的类型 rknn = RKNN(verbose=True) #配置文件 print('--> config model') rknn.config(**config['config']) print('done') print('--> Loading model') load_function = getattr(rknn, _model_load_dict[model_type]) ret = load_function(**config['parameters'][model_type]) if ret != 0: print('Load yolo failed! Ret = {}'.format(ret)) exit(ret) print('done') #### #print('hybrid_quantization') #ret = rknn.hybrid_quantization_step1(dataset=config['build']['dataset']) if model_type != 'rknn': print('--> Building model') ret = rknn.build(**config['build']) print('acc_eval') rknn.accuracy_analysis(inputs='./dataset1.txt', target='rk3399pro') print('acc_eval done!') if ret != 0: print('Build yolo failed!') exit(ret) else: print('--> skip Building model step, cause the model is already rknn') #导出RKNN模型 if config['running']['export'] is True: print('--> Export RKNN model') ret = rknn.export_rknn(**config['export_rknn']) if ret != 0: print('Init runtime environment failed') exit(ret) else: print('--> skip Export model') #初始化 print('--> Init runtime environment') ret = rknn.init_runtime(**config['init_runtime']) if ret != 0: print('Init runtime environment failed') exit(ret) print('done') print('--> load img') img = cv2.imread(config['img']['path']) print('img shape is {}'.format(img.shape)) img = cv2.cvtColor(img, cv2.COLOR_BGR2RGB) inputs = [img] print(inputs[0][0:10,0,0])#推理 if config['running']['inference'] is True: print('--> Running model') config['inference']['inputs'] = inputs #print(config['inference']) outputs = rknn.inference(inputs) #outputs = rknn.inference(config['inference']) print('len of output {}'.format(len(outputs))) print('outputs[0] shape is {}'.format(outputs[0].shape)) print(outputs[0][0][0:2]) else: print('--> skip inference')#评价 if config['running']['eval_perf'] is True: print('--> Begin evaluate model performance') config['inference']['inputs'] = inputs perf_results = rknn.eval_perf(inputs=[img]) else: print('--> skip eval_perf') if __name__ == '__main__': main()
running: model_type: onnx # 转换模型的类型 export: True # 转出模型 inference: False eval_perf: True parameters: caffe: model: './mobilenet_v2.prototxt' proto: 'caffe' #lstm_caffe blobs: './mobilenet_v2.caffemodel' tensorflow: tf_pb: './ssd_mobilenet_v1_coco_2017_11_17.pb' inputs: ['FeatureExtractor/MobilenetV1/MobilenetV1/Conv2d_0/BatchNorm/batchnorm/mul_1'] outputs: ['concat', 'concat_1'] input_size_list: [[300, 300, 3]] tflite: model: './sample/tflite/mobilenet_v1/mobilenet_v1.tflite' onnx: # 填写要转换模型的model model: './best_noop.onnx' #best_op.onnx #best_noop.onnx #C:\Users\HP\Desktop\CODE\yolov5_for_rknn-master\weights\best.onnx darknet: model: './yolov3-tiny.cfg' weight: './yolov3.weights' pytorch: model: './yolov5.pt' input_size_list: [[3, 512, 512]] mxnet: symbol: 'resnext50_32x4d-symbol.json' params: 'resnext50_32x4d-4ecf62e2.params' input_size_list: [[3, 224, 224]] rknn: path: './bestrk.rknn' config: #mean_value: [[0,0,0]] #std_value: [[58.82,58.82,58.82]] channel_mean_value: '0 0 0 255' # 123.675 116.28 103.53 58.395 # 0 0 0 255 reorder_channel: '0 1 2' # '2 1 0' need_horizontal_merge: False batch_size: 1 epochs: -1 target_platform: ['rk3399pro'] quantized_dtype: 'asymmetric_quantized-u8'#asymmetric_quantized-u8,dynamic_fixed_point-8,dynamic_fixed_point-16 optimization_level: 3 build: do_quantization: True dataset: './dataset.txt' # '/home/zen/rknn_convert/quant_data/hand_dataset/pic_path_less.txt' pre_compile: False export_rknn: export_path: './best_noop1.rknn' init_runtime: target: rk3399pro device_id: null perf_debug: False eval_mem: False async_mode: False img: &img path: './test2.jpg' inference: inputs: *img data_type: 'uint8' data_format: 'nhwc' # 'nchw', 'nhwc' inputs_pass_through: None eval_perf: inputs: *img data_type: 'uint8' data_format: 'nhwc' is_print: True
When setting parameters in the config section, it is recommended to refer to the official API documentation to select the appropriate parameters, as described in the Rockchip_User_Guide_RKNN_Toolkit_V1.6.1_CN.pdf file.
6. Model Inference on RK3399Pro
In the detect folder, the data/image subdirectory contains the images to be detected, and the models folder contains the converted RKNN model.

Finally, open the shell and execute:
python rknn_detect_for_yolov5_original.py
The development board will generate the model inference results and time.

The inference time is relatively fast, around 60 milliseconds. This inference speed is similar to what I get when using the model for detection on my laptop (RTX 3060).
7. Model Pre-compilation
Solves the problem of excessively long model loading times.
from rknn.api import RKNNif __name__ == '__main__': # Create RKNN object rknn = RKNN()# Load rknn modelret = rknn.load_rknn('./best_as_200.rknn')if ret != 0: print('Load RKNN model failed.') exit(ret)# init runtimeret = rknn.init_runtime(target='rk3399pro', rknn2precompile=True)if ret != 0: print('Init runtime failed.') exit(ret)# Note: the rknn2precompile must be set True when call init_runtimeret = rknn.export_rknn_precompile_model('./best_pre_compile.rknn')if ret != 0: print('export pre-compile model failed.') exit(ret)rknn.release()
The conversion environment is on the RK3399Pro; the method is clumsy but effective.
Using the generated model with the inference code on the RK3399Pro for prediction, the model inference speed is around 50 milliseconds, achieving 20 FPS. This is quite fast for a Python API.
Reference:
https://github.com/EASY-EAI/yolov5
https://github.com/soloIife/yolov5_for_rknn
https://github.com/ultralytics/yolov5
https://github.com/rockchip-linux/rknn-toolkit
https://blog.csdn.net/weixin_42237113/category_10147159.html?spm=1001.2014.3001.5482