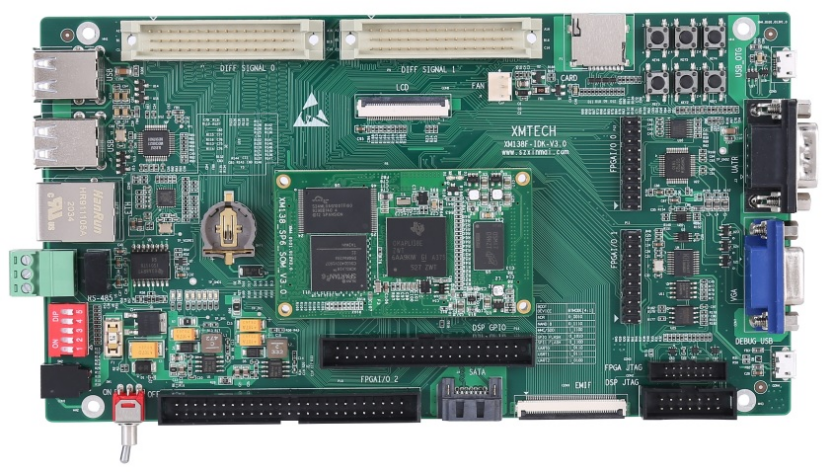
C6748/OMAPL138 Network Web Server/Socket Example Development
- This example is based on the Xinmai XM138F-IDK-V3 development board.
- ENET_HTTPD**——Network**** Web Server**
This program implements network communication functionality, setting up a lightweight Web server on the development board. Connect the network cable.
Load the ENET_HTTPD.out file according to the project import steps, then click the program run button.
Demonstration Phenomena
(1) The serial port displays the development board's IP address (169.254.3.5).
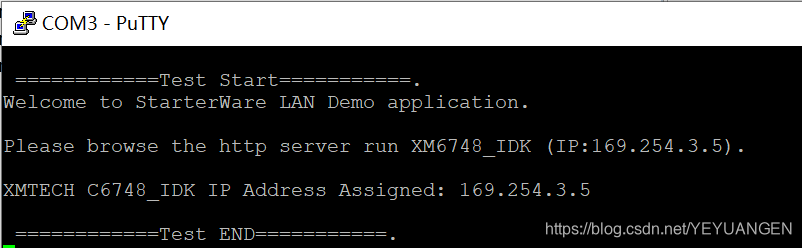
Figure 219
- Enter
cmdat the bottom of the Windows Start menu to open the console window, then execute thepingcommand to confirm that the development board's network is working correctly.
DOS# ping 169.254.3.5
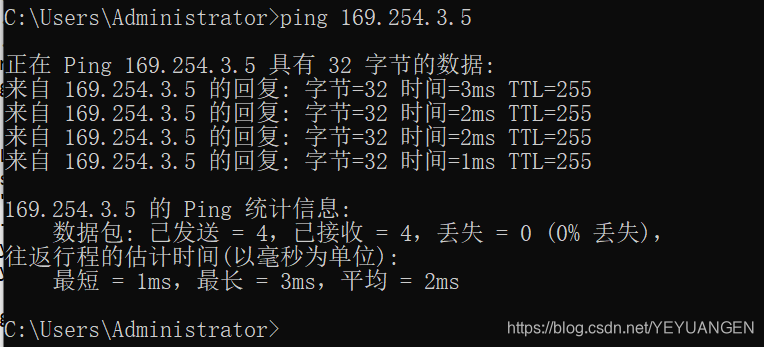
Figure 220
- Open a browser and enter the URL http://192.168.1.200 to view the website content.

Figure 221
- IP Modification Method
Modify the corresponding bits in the lwipopts.h file as follows:
#define STATIC_IP_ADDRESS 0xA9FE0305
Where 0xA9FE0302 is hexadecimal, corresponding to IP: 169.254.3.5. The meaning of the corresponding bits is:
A9:169
FE:254
0****3:3
05:5
Please modify as needed.
Figure 222
-
- ENET_HTTPD_RMII**——Network**** Web Server (using RMII interface)**
This program implements network communication functionality using the RMII interface, setting up a lightweight Web server on the development board. Connect the network cable to the RMII interface.
Load the ENET_HTTPD_RMII.out file according to the project import steps, then click the program run button.
Demonstration Phenomena
- The serial debug terminal displays the development board's IP address (169.254.3.5).
Figure 222
- Enter
cmdat the bottom of the Windows Start menu to open the console window, then execute thepingcommand to confirm that the development board's network is working correctly.
DOS# ping 169.254.3.5
Figure 22
- Open a browser and enter the URL http://169.254.3.5 to view the website content.
Figure 224
- IP Modification Method
Modify the corresponding bits in the lwipopts.h file as follows:
#define STATIC_IP_ADDRESS 0xA9FE0305
Where 0xC0A801C8 is hexadecimal, corresponding to IP: 169.254.3.5. The meaning of the corresponding bits is:
A9:169
FE:254
0****3:3
05:5
Please modify as needed, as shown in the figure below:
Figure 225
-
- ENET_ECHO**——Network**** Socket Communication**
This program primarily demonstrates Socket communication, with the development board acting as a server and the PC as a client, enabling data exchange. First, connect the network cable, load the ENET_ECHO.out file according to the project import steps, then click the program run button.
Demonstration Phenomena
The serial port displays the development board's IP address (192.168.1.200) and port (2000), as shown in the figure below:
Figure 226
UI Program Demonstration
First, enter cmd at the bottom of the Windows Start menu to open the console window, then execute the ping command to confirm that the development board's network is working correctly.
DOS# ping 169.254.3.5
Figure 227
Double-click "demo\HostApp\ENET_ECHO\enet_client\debug\enet_client.exe" on the CD to run the UI program (if an error occurs, recompile with VS2005 and run again). The following interface will appear:
Figure 228
The UI program can choose single send/receive or multiple send/receive. Users can modify the content of the sent data in the program. The program will compare and verify the sent and received content. After clicking "Establish Connection" and then "Read/Write Test", the following interface will appear:
Figure 229
Using the Wireshark Capture Tool
Wireshark is a network packet analysis software. The function of network packet analysis software is to capture network packets and display the most detailed network packet information possible.
The Wireshark software path is located on the CD at: demo\HostApp\Wireshark-win32-1.10.3.exe. Please double-click to install this software. After successful installation, open the Wireshark software, as shown in the figure below:
Figure 230
Then, click steps 1->2->3 as shown in the figure below:
Figure 231
After clicking Start, the following interface will appear:
Figure 232
Then, follow steps 1->2->3 as shown in the figure below, and in step 2, set the IP address to be monitored to 192.168.1.200, as shown in the figure below:
Figure 233
After clicking OK, the following interface will appear:
Figure 234
Then, click the "Read/Write Test" button in the UI program or execute the "ping 192.168.1.200" command on the PC. Wireshark will print the monitored information, as shown in the figure below:
Figure 235
Figure 236